
On This Page
Need more help?
 Contact Us
Canvas video overview
The video below provides a demonstration of basic Canvas features and functions.
Canvas dashboard and global navigation
Your Canvas Dashboard is the first thing you see when you log into Learning@Griffith and helps you to see what is happening in all your current courses.
The Dashboard is made up of:
- The global navigation bar on the left hand side of the screen that will stay with you no matter where you are in Canvas; where you can easily access your courses, calendar, inbox, 24/7 help and more.
The calendar in Canvas shows you course events and assessments. For instructions on how to link your Canvas calendar to your Outlook calendar, see How do I subscribe to the Calendar feed using Outlook as a student? (Canvas Guides).
- A centre panel which displays your courses in either card, list or recent activity view; and
- A right hand panel which shows your To-Dos and Marks.
The Dashboard will also highlight new announcements to help you keep up to date with your course activity.
To learn more about how your course sites are set up, see Your course sites.
For further information, see How do I use the Dashboard as a student? (Canvas Guides).
Customising Canvas
The video below shows you how to customise your Canvas experience, including what you see on the Dashboard, how you view your calendar, and how you receive important course notifications.
For further information on customising Canvas, including adjustments for improved accessibility, see Accessibility in Learning@Griffith.
Notification settings in Canvas
By default, you will receive notifications when updates happen in your Canvas courses. For information on how to view and change what notifications you receive for all your Canvas courses, see How do I manage my Canvas notification settings as a student? (Canvas Guides).
It is also possible to have different notification settings for specific courses. For information on how to achieve this, see How do I manage notifications for a single course as a student? (Canvas Guides).
Please note, if you turn notifications off, you may miss important course related messages.
How do I view all my Canvas courses as a student?
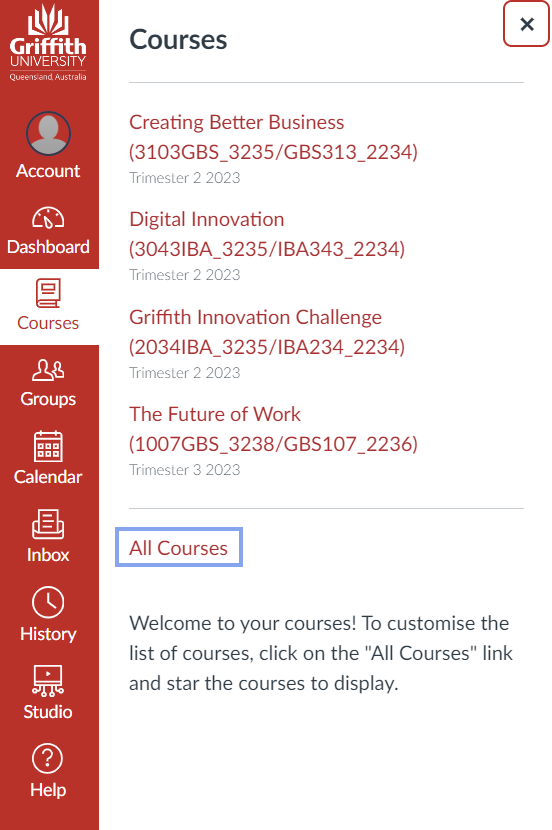
Learning@Griffith displays all your Canvas courses. From the Courses link on the global navigation, courses can be organised into All Courses, Past Enrolments, Future Enrolments and My Groups.
Courses that are part of the current trimester appear under All Courses. You can favourite courses to have them appear on your Dashboard. Depending on the access settings of a course, All Courses can also display courses that have not yet started or are unpublished. Published courses are listed in red text and include a link to the course.
To access a list of all your Canvas courses:
- Click in Courses link in left-hand Global Navigation
- Click the All Courses link to display all your Canvas courses
- Click the name of the course that are linked to access it
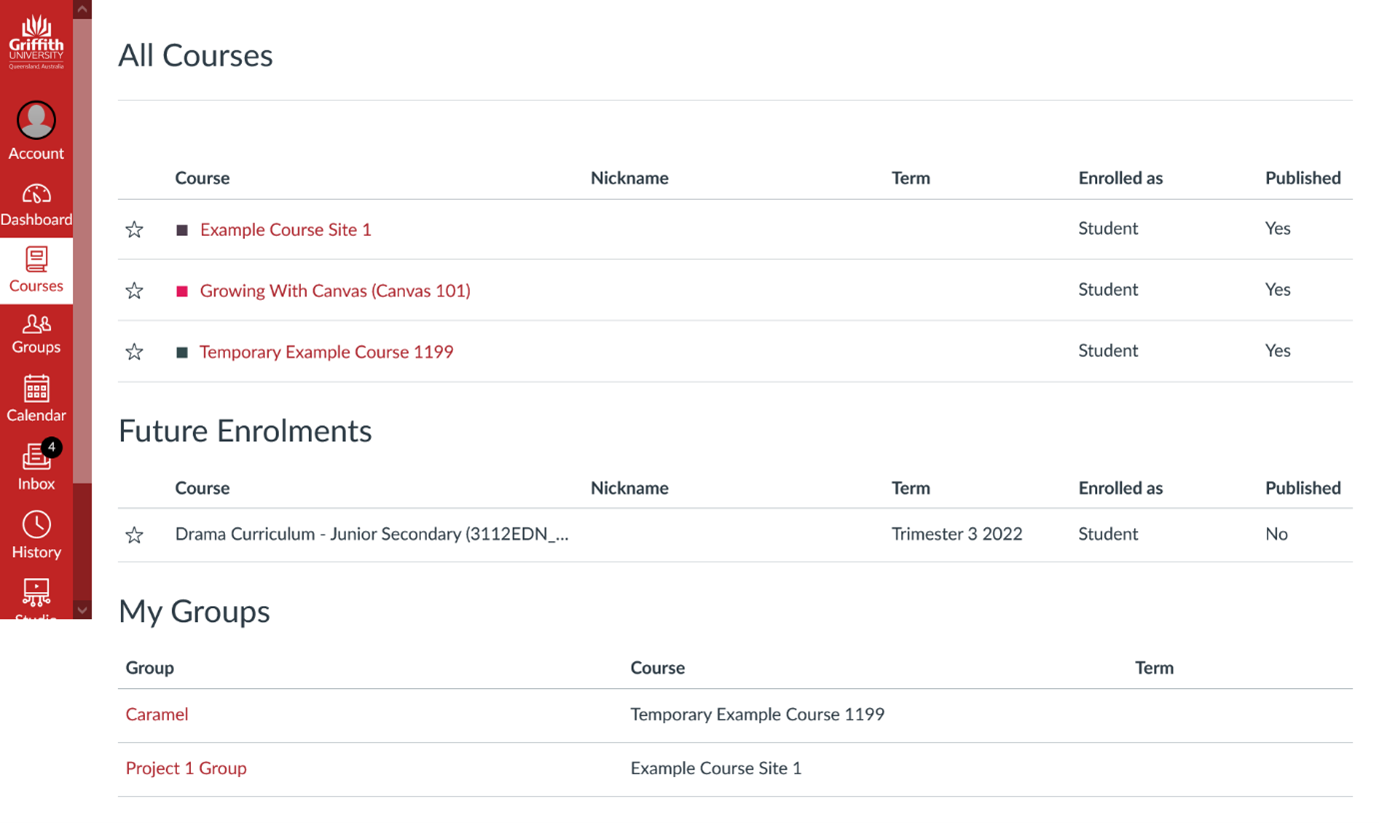
If you can’t see a course that you are enrolled in for the current trimester, try looking under All Courses to check if it has been published. Some courses will remain unpublished until the start date, particularly for dynamically dated courses and intensives. If you don’t find a course that you are expecting to study under All Courses, check your myGriffith enrolment.
You can access published courses only. This means they are made available to you and the course names include a link. You will not be able to access unpublished courses that are not made available to you yet.
Your Canvas Calendar
The Calendar is a great way to view everything you have to do for all your courses in one place. You can view calendar events by day, week, month, or agenda list. The calendar also includes access to the Scheduler, which is an optional scheduling tool in Canvas.
This is a separate calendar system to your Outlook calendar that is linked to your student email. You are able to subscribe to the Calendar feed to your preferred calendar, including Outlook.com (Canvas Guides) or Google Calendar (Canvas Guides) to have all your information one place.
For more information, see How do I use the Calendar as a student? (Canvas Guides).
Your Canvas Inbox
The inbox in Canvas, accessible in the left-hand menu is one way to contact your course convenor. It's also a handy way to communicate with your peers or when working on group projects.
This is a separate messaging system to your student email in Outlook.
For information on how to navigate your inbox, see How do I use the Inbox as a student? (Canvas Guides).
Files
The Files area is where you store and manage documents, images, and other files in Canvas. Depending on your role, you can find files in three places:
- User files: your personal files, such as profile pictures and assignment submissions. Only you can see them.
- Course files: files for each course you're enrolled in.
- Group files: files for each group you belong to.
Open your files
- In Global Navigation, click Account.
- Click Files.
The All My Files page shows your own folders, plus your course and group folders. Click any folder name to see what's inside. To see your personal files and how much of your storage you've used, click My Files.
What's in My Files
Canvas creates some folders for you automatically once you upload a related file:
- Conversation attachments: files you attach to Inbox messages
- Data Exports: ZIP files from downloading your assignment submissions
- Profile pictures: photos you upload as your profile picture, if your institution allows it
- Submissions: copies of your assignment submissions, organized by course
- Unfiled: files you attach to discussion posts and replies
- Uploaded Media: media you record or upload
Storage limit
Each user gets 50 MB of storage by default, though your institution may change this. Files you upload with the Rich Content Editor count toward your limit. Files submitted as assignments do not.
Manage your files
Inside a folder, you can see each file's name, created and modified dates, who last modified it, and its size. Click a column heading to sort.
You can:
- Search for files by name
- Add a folder or upload a file
- Rename, download, move, or delete a file or folder (click the File Options icon)
- Publish, unpublish, or restrict access to a file
- Select several files at once with the checkboxes, then download, move, or delete them together
For more information, see:
ePortfolio
ePortfolio is a light touch version of a portfolio tool provided to each user in Canvas. This tool allows you to collect and document your work throughout your time at Griffith, including journaling activities and digital projects, and put your efforts on display. ePortfolios can be made either public or private at any time, so you have the freedom to share your portfolio URL as you like.
The default storage capacity of ePortfolio in Canvas has been increased from 50mb to 200mb for Griffith.
You will not retain access to Canvas portfolio after graduation. As such, for professional portfolio type activities and assessment we recommend the use of PebblePad.
To find out how you can access and use ePortfolio, see How do I create a new ePortfolio? (Canvas Guides).