
On This Page
Need more help?
 Contact Us
Markbook
The Markbook is the mandated tool for managing marking at Griffith University. Marks in Learning@Griffith are provided to students for the assessment tasks as specified in each Course Profile. These marks are then passed over to the Grade Management System to calculate, approve, and award student grades.
In Canvas, three areas work together to communicate assessment details to the students (Assessment Overview Page), facilitate the submission, marking, and calculations (Assignments), and hold the marks for each assessment item (Marks/Markbook).
We have hidden the Assignments section from Student View. This is only used by staff to check the assignment group set-up, which is important for GMS calculations. Remember - the “Points Possible" of an assessment item in Learning@Griffith must match the "Marked out of" value defined in the Course Profile. Assessment submissions points should be set up in context in the Modules section of your site and linked to on the Assessment Overview Page for ease of navigation for the students.
The following articles go into more detail on using the Markbook and marking assessments:
Filtering and ordering the Markbook
Filters in Markbook
You can filter the Markbook either by assignment groups, modules and sections. You can auto-arrange/order Markbook columns by assignment name, due date, points, or module, or you can manually arrange columns by dragging columns into position. For more information, see How do I arrange columns in the Markbook? (Canvas Guides)
To view the Markbook filters, click the Apply Filters button. Clicking a filter preset toggles the filter on and off. Additionally, a checkmark displays when the filter is active. For more information, see How do I use Enhanced Markbook Filters? (Canvas Guides)
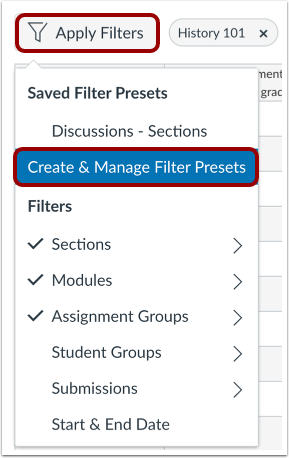
To manage the Markbook filters, click the Apply Filters button, then click the Create & Manage Filter Presets link. In the Saved Filters Preset sidebar, you can create new and manage existing Markbook filters.
Creating new filters
- In the Markbook, click the Apply Filters button
- Click the Create & Manage Filter Presets link
- Click the Create Filter Preset expand arrow icon
- Give the filter preset a name
- Select your filter based on:
- assignment groups (e.g. assignments, discussions, quizzes), or
- modules, or
- sections, or
- student groups, or
- submissions, or
- start dates and end dates.
- Click the Save Filter Preset button
If you wish to restrict certain Markers to their specific classes, you can enrol the relevant Markers into the specific Class Sections only.
For more information, see How do I create a filter in Enhanced Gradebook Filters? (Canvas Guides)
Editing filters
- In the Markbook, click the Apply Filters button
- Click the Create & Manage Filter Presets link
- In the Saved Filters Preset sidebar, existing filters display. Click on the expand arrow to:
- Rename the filter preset
- Change the filter preset's filter type
- Delete the filter
- Click the Save Filter Preset button
For more information, see How do I edit a filter in Enhanced Gradebook Filters? (Canvas Guides)
Organising student names
You are able to split student first and last names into separate columns in the Markbook.
- In the Markbook, click the Setting icon on the top right
- Click the View Options tab
- Click the Split Student Names checkbox
- Click Apply Settings
For more information, see How do I view the Split Student Name column in the Markbook? (Canvas Guides).
Posting or releasing marks to students
Posting policies at Griffith University have been set for all courses to “manual posting”. To check your course is set to manual posting you go to Marks > Markbook Settings. When this setting is in place, columns will appear with Manual in the column header.
![]()
Manual posting requires the Instructor to determine when marks are to be released for each column of the Markbook. Manual posting will provide a mechanism to release marks to students, only once marking and marking moderation has been completed.
To post marks for a column or change the posting policy for a column, click on the 3 dots in the column header and select Post Marks or Mark Posting Policy.
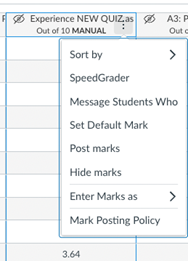
Canvas has a feature called 'Message Students Who', which allows you to send an Inbox message to any students who have not yet completed a particular assignment. For more information, see How do I send a message to students from the Gradebook? (Canvas Guides).
For more information, see How do I use posting policies in a course? (Canvas Guides).
Setting blank marks to zero [0]
It is highly recommended that Instructors set a Grade Status of “Missing” for all blank [-] marks (non-submitted work) after the due date (excluding any approved extensions), then set by Default all blank marks to zero [0], before grades are posted. Leaving blank [-] marks will incorrectly calculate totals shown to both Instructors and Students, and incorrectly drop the wrong marks when applying any assignment groups rules. For detailed instructions on how, see How do I set a default grade for an assignment in the Gradebook? (Canvas Guides).
Checking and/or editing Markbook settings
Posting policies at Griffith University have been set for all courses to Manually Post Marks.
To check and/or edit the Markbook Settings click the cog icon (at the top right of the page).
While the marks for an assignment are set to manual, students will not receive new notifications about or be able to see:
- Their mark for the assignment
- Mark change notifications
- Submission comments
- Curving assignments
- Score change notifications.
Once a mark is posted manually, it will automatically send new notifications and be visible to students.
Using icons and colours in the Markbook
The Markbook includes several icons and colours that may display in the assignment columns, assignment groups, and Total column. Icons and colours are simply Markbook indicators to assist you with marking.
For more information, see How to use the icons and colours in Markbook (Canvas Guides).
Automated Assessment Extension
Assessment Application Reports are accessible via the Faculty Centre and allows for quick and seamless navigation from Canvas Markbook to the Faculty Centre for Convenors only.
The Faculty Centre button is accessible to Convenors via the Canvas Markbook

It can assist with:
- Identifying students with approved assignment extensions, including those that are auto approved to update assessment due dates in Canvas
- Identifying students with approved deferred or special consideration applications
Importing external marks into Canvas
For more information, see Importing external marks into Canvas.