On This Page
Need more help?
 Contact Us
How do I record and manage my teaching session?
In brief, timetabled sessions in Griffith spaces, like lectures, are captured in Echo360 and online sessions taught in either Microsoft Teams, which are recorded in the Teams platform, or Class Collaborate. The image and table below explain this and how to edit your recording if you wish.
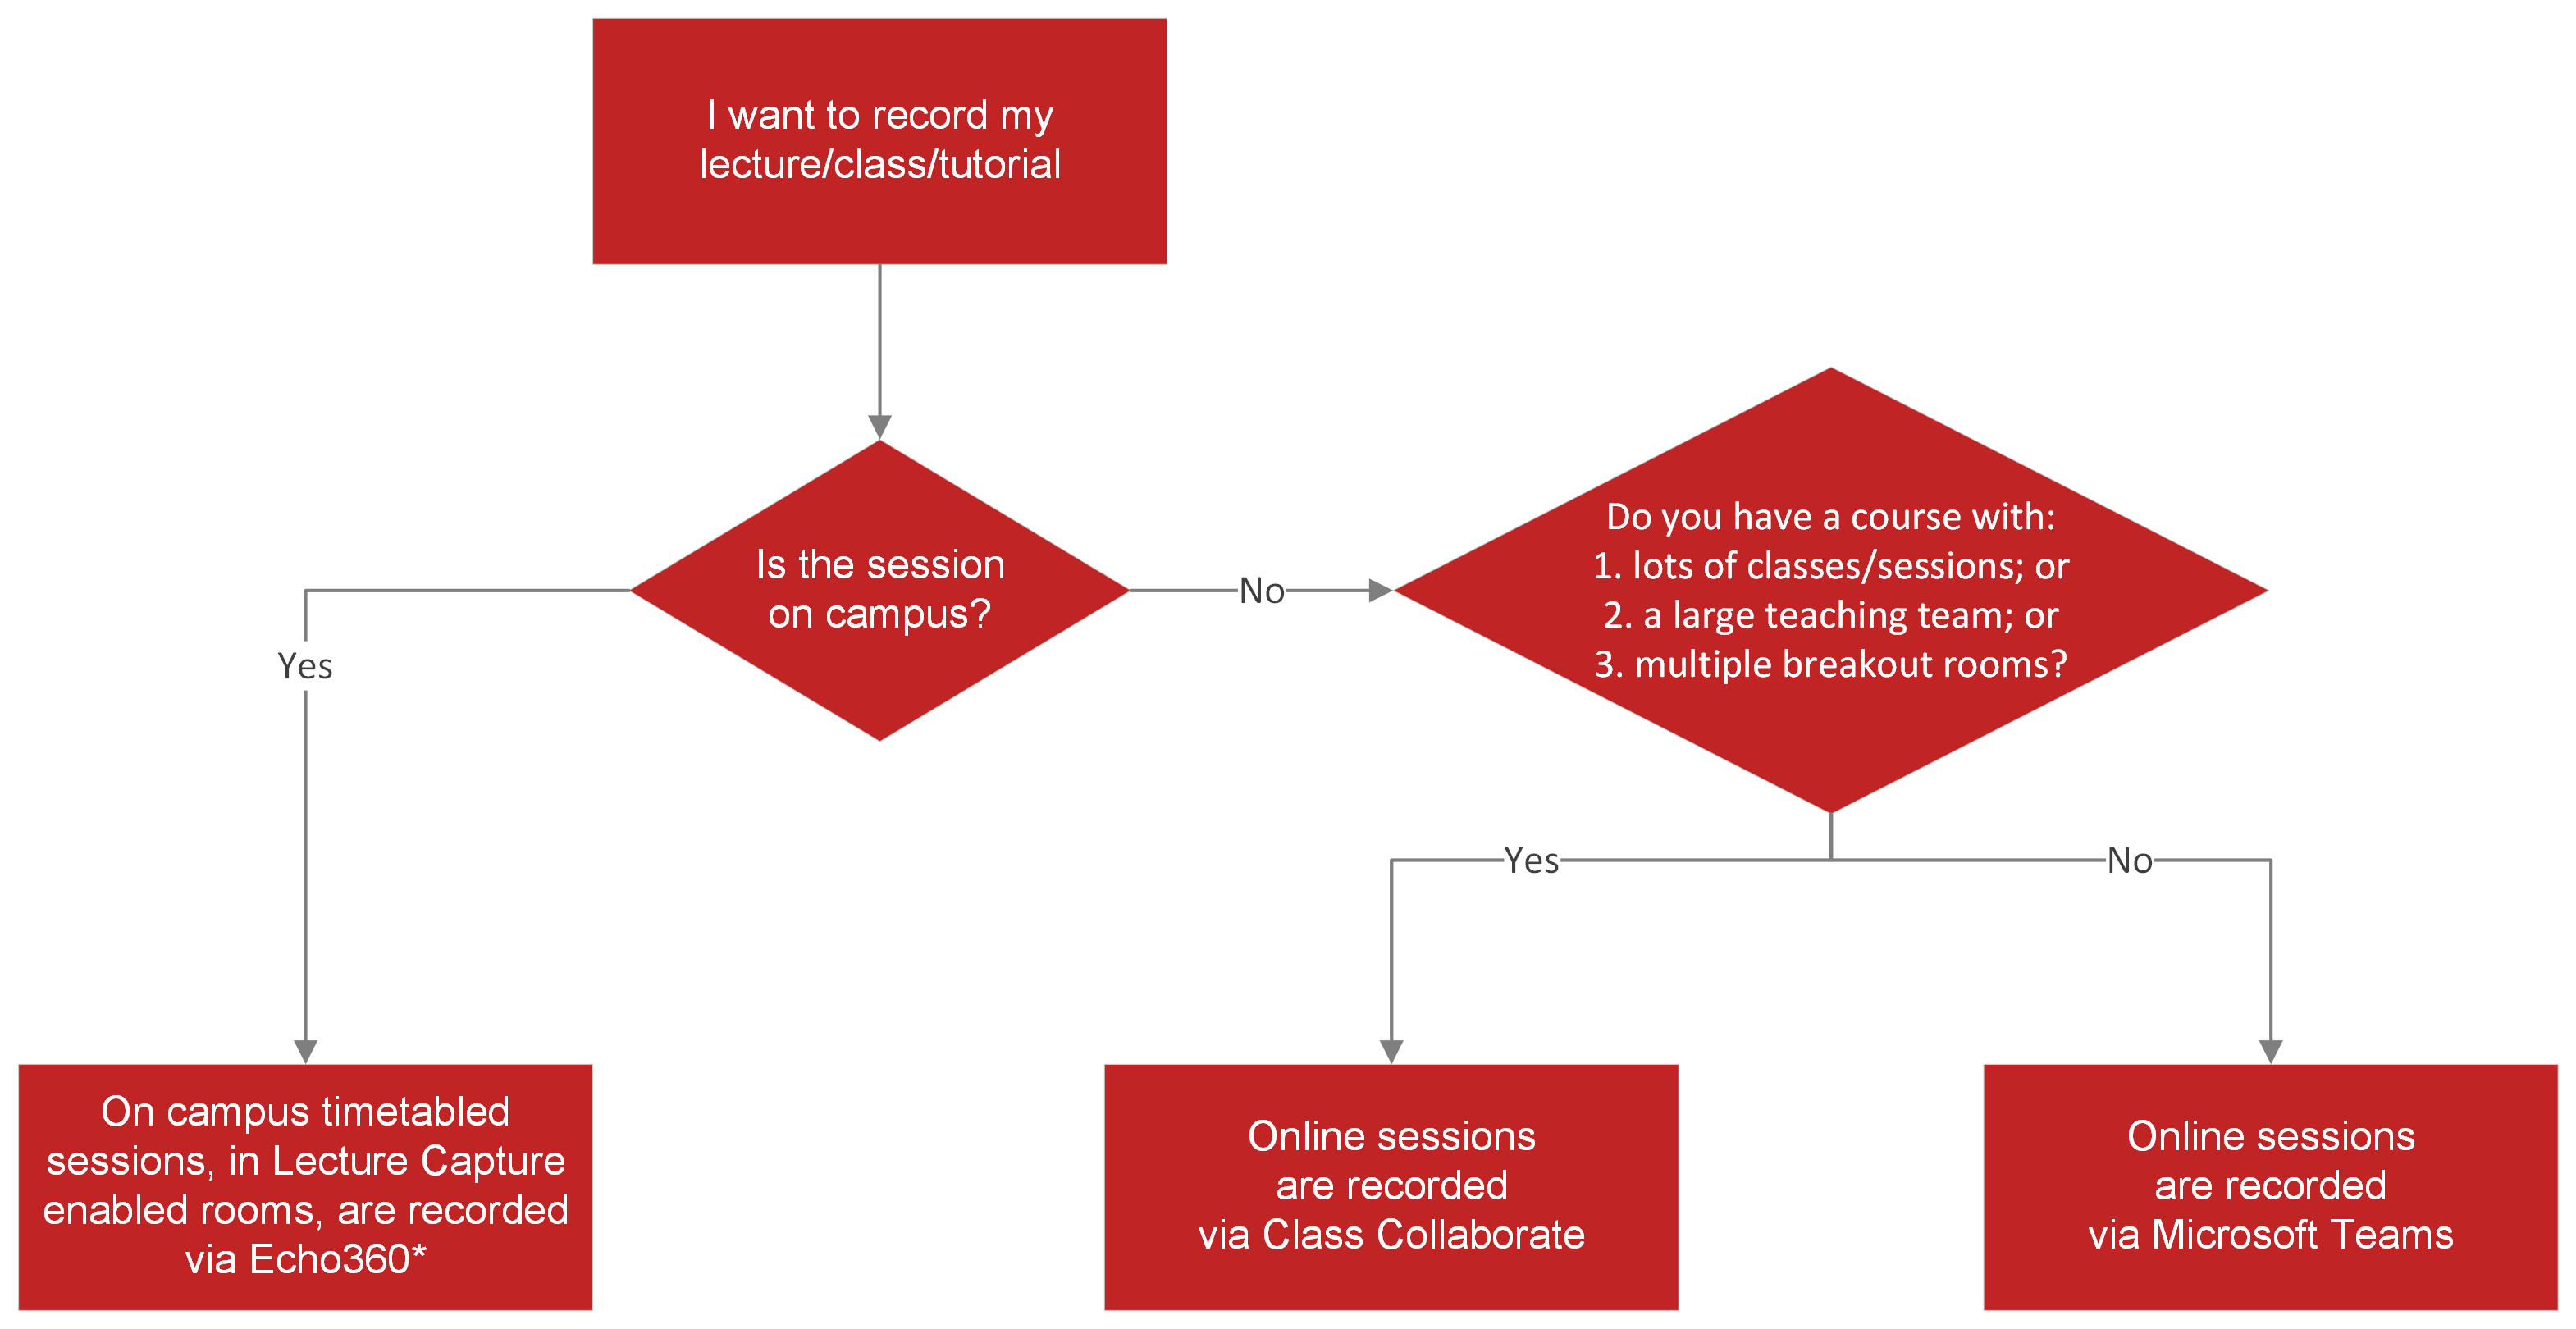
Figure 1 visualises three ways timetabled sessions on Griffith sessions are captured.
*learn more about Delivering Classes with Lecture Capture, including how to ensure your session is recorded.
| Questions | Echo360 | Class Collaborate | Microsoft Teams |
|---|---|---|---|
| Where is this hosted? | All recordings are hosted on Echo360. | Collaborate recordings (Class Collaborate Support) are saved within the Collaborate LTI via Menu > Recordings. |
|
How do students access this recording? | Echo360 links need to be created and or configured in each Learning@Griffith course site for student access. Links can be added to either the course navigation menu or to a module. See below for further detail. | Collaborate recordings (Class Collaborate Support) are saved within the Collaborate LTI via Menu > Recordings. | Teams recordings appear in a few different places depending on how the meeting was configured
See below for more details |
Who can I share this recording with? | Content is made available via a class, with all the students enrolled in that class. | Everyone with access to the course can view the recording (Class Collaborate Support). If you want to share your recordings with anyone not in a course (Class Collaborate Support), you need to make them available to the public. Open the Recording Settings and in the Access menu select Public. | For Teams meeting recordings set up through Teams Meetings or via the meeting link embedded in a page or Calendar, save your recording in either Canvas Studio or Microsoft Stream and post the link in your course site. Students who join after you have set up the meeting, or those that decline the meeting, will not see the chat nor have access to the recording via the teams meeting. |
Can students see captions? | Echo360 offers an auto-caption service. As of Trimester 1, 2022 automatic speech recognition has been turned on for all Echo360 sections. | Moderators can enable auto-captioning for each recorded session within the Recording Settings. The option of live closed captioning (Class Collaborate Support) is available if independently organised with the Disability and Accessibility team. | Teams can detect what is said in a meeting and present real-time captions (Microsoft Support). |
Are transcripts generated? | Echo360 offers an auto-caption service. As of Trimester 1, 2022 automatic speech recognition has been turned on for all Echo360 sections. | If the moderator has allowed session recording downloads, you can download recordings and transcripts from the recording player Recording menu (Class Collaborate Support). | During any Teams meeting, you can start a live transcript (Microsoft Support) of the proceedings. When the meeting is over, the transcript is immediately available for meeting participants to download. |
Any gotcha’s? | All timetabled lectures are scheduled for recording by default. All other timetabled teaching activities are not scheduled for recording by default. You can opt-in to having these activities recorded by specifying a lecture capture requirement in the class timetabling resources data collection process. | Teams meetings not scheduled inside a Team (option 1 above), students who join the course after you have set up the meeting, or those who decline the meeting, will not automatically see the recording or the chat. You will need to post the link or save the recording to your class Studio Library to enable this recording to be visible to all students. |
| Editing the recordings | Echo360 | Class Collaborate | Microsoft Teams |
|---|---|---|---|
| How do I trim this recording? | The Echo360 video editor (Echo360 Support) provides a basic set of video editing functionality including the ability to:
| To edit a Class Collaborate recording, owners can download the MP4 file and edit a third-party video editing software. To add a title page, or chunk your recording, you can load your file to ClipIt, or you could do it yourself using Premier Rush, or either Microsoft Video Editor app on Windows or iMovie on Mac | If you are an owner of the video, you can trim videos using Microsoft Stream (Microsoft Support). |
| How do I add a page title or chunk this recording? | See above | See above | To add a title page, chunk or bookmark your recording, you may need to use either Microsoft Video Editor app on Windows or iMovie on Mac. Alternatively, you can load your file to ClipIt to trim, add a title page, or chunk your recording. You will need to be an owner of the file to download it from Stream. |
How do I bookmark places on this recording? | See above | See above | Stream on SharePoint enables owners to manually create video chapters (Microsoft Support), enabling viewers to jump to the part they are interested in. |
Managing Echo360 recordings
For information on navigating the site, see Navigation around Echo360 (Echo360 Support).
Echo360 links need to be created and or configured in each Learning@Griffith course site for student access. Echo360 Links can be added to either the course navigation menu or to a module by following the instructions outlined below.
For some external learning tools, Student View may not accurately reflect what students see in Canvas courses. For example, clicking on a link to Echo360 in Canvas will always return an error message in Student View, even when the link is working correctly for students. This is not an error, but simply a limitation of Student View functionality.
As part of Echo360 integration a registration email is sent to instructors when accounts are created. The email contains the subject, ‘You've been invited to create an Echo360 account’ with a link that allows the instructor to create their account or complete the registration process for the Echo360 platform but in the Griffith system, this part is automatically done for instructors so this process of registering via the email can be ignored.
Linking Echo360 recordings from the Course Navigation Menu
The Echo360 menu item is not enabled/ visible in the course menu by default. To enable the Echo360 menu item:
This linking method is limited to connecting one Echo360 section to the Echo360 course menu item in Learning@Griffith. To link to multiple sections (e.g. different campus recordings) in Echo360 follow the instructions below under 'Linking Echo360 recordings in a Module'.
- Open the Settings Navigation menu item
- Select the Navigation tab at the top of the page
- All menu items in the top list are enabled/ visible in the course menu and all items in the bottom list are disabled/ not visible in the course menu. The availability of each item including Echo360 can be adjusted by either dragging the item or selecting the disable/ enable option for each.
- Click Save to register the change
- Select the Echo360 item from the course navigation menu to open the configuration page.
- Select the appropriate Term, Course and Section from the drop-down list.
- In step 2 of the configuration settings, there is an option to select either Link to the Section Home, which will create a link to a list of all recordings that have been published to the course selected in step 1, or Link to a Classroom which will create a link to an individual recording from the list of recordings published to the course selected in step 1.
- Select Link Content.
Linking Echo360 recordings in a Module
- Create a new module or navigate to a pre-existing module.
- Select the plus icon on the right-hand side of the page in line with the Module name.
- Open the drop-down menu and select External Tool.
- Click on Echo360 Course Navigation.
- Adjust Page Name to an appropriate link title for the recording/s for example 'Lecture Recordings NA'.
- Click on the new Echo360 link which will open the configuration page.
- Select the appropriate Term, Course and Section from the drop-down list. In step 2 of the configuration settings there is an option to select either ‘Link to the Section Home’ which will create a link to a list of all recordings that have been published to the course selected in step 1 or ‘Link to a Classroom’ which will create a link to an individual recording from the list of recordings published to the course selected in step 1.
- Select 'Link Content'.
- To create additional Echo360 links to other sections repeat steps 2-8.
Alternatively, you can embed Echo360 Media into a page (or anywhere with the Rich Content Editor). For guidance on how, see Embedding Echo360 Media into Canvas (Echo360 Support).
Updates to the Echo360 Player
The external vendor Echo360 recently issued an update for the Echo player, which unfortunately caused playback issues for Safari and iOS users. To address this, Learning@Griffith has reverted to the previous version of the Echo player, ensuring compatibility for all users on both Android and iOS devices.
However, this rollback entails some additional effects. Specifically, the following features will no longer be accessible
- The creation of Playlists using the Easy Embed tool within Canvas.
- The ability to enable or disable Discussions for embedded content using the Easy Embed tool.
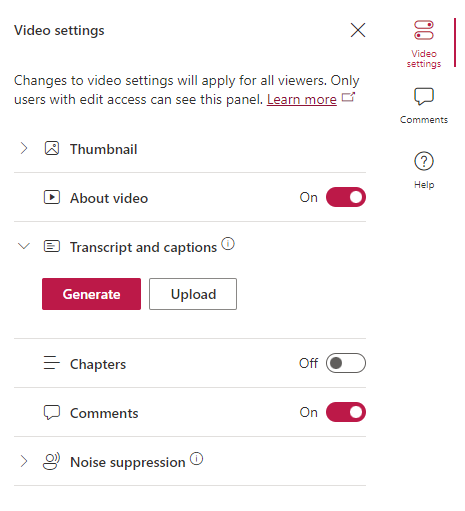
Video accessibility, Automatic Speech Recognition and Echo360 Transcripts
Echo360 provides Automatic Speech Recognition for all audio and video media. ASR involves the use of computer software to translate speech into text, and then sync the text with the video content.
For more information, see Automatic Speech Recognition (ASR) Service for Media Transcription (Echo360 Support)
All transcripts will automatically be pushed to the closed captioning track IF an accuracy/confidence score for the transcript meets or exceeds the threshold set by the System Administrators. If the media ALREADY HAS closed captions (regardless of how they got there) those WILL NOT be replaced by auto-pushed transcripts.
Transcriptions and Captions (generated by ASR) can be edited or removed entirely by teaching staff. If there are any issues with this process, Learning and Teaching Solutions can provide assistance.
For more information, see Deleting Transcripts from Media (Echo360 Support)
When viewing an Echo360 recording, click the transcript button to open the transcript.
- For the older media player, the button is toward the right in the top toolbar (first image below)
- For the newer media player, the button is toward the right in the bottom toolbar (second image below)
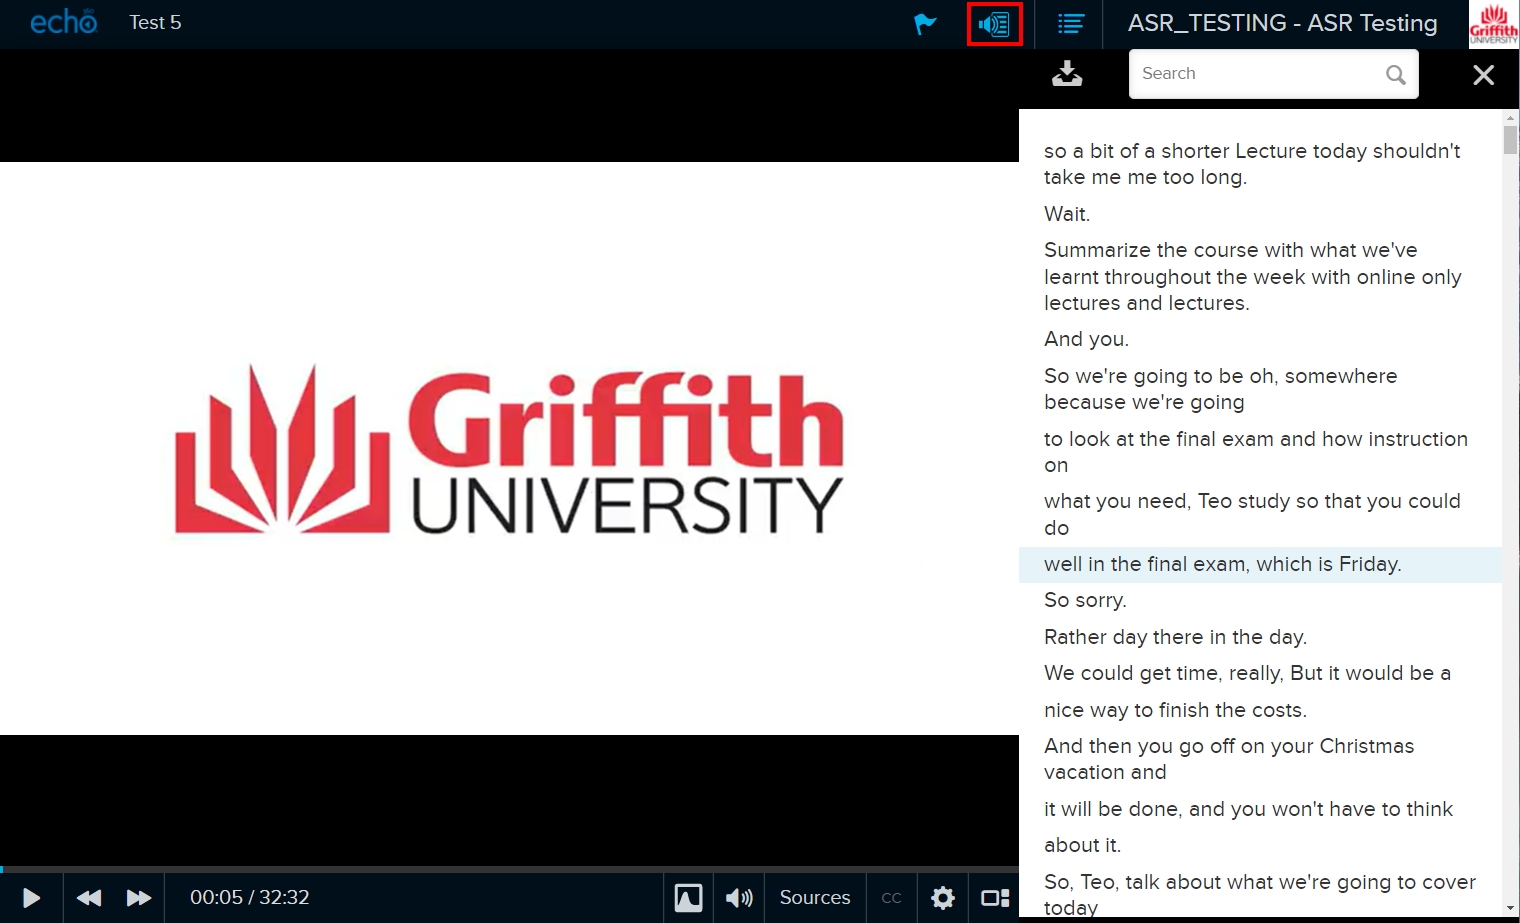
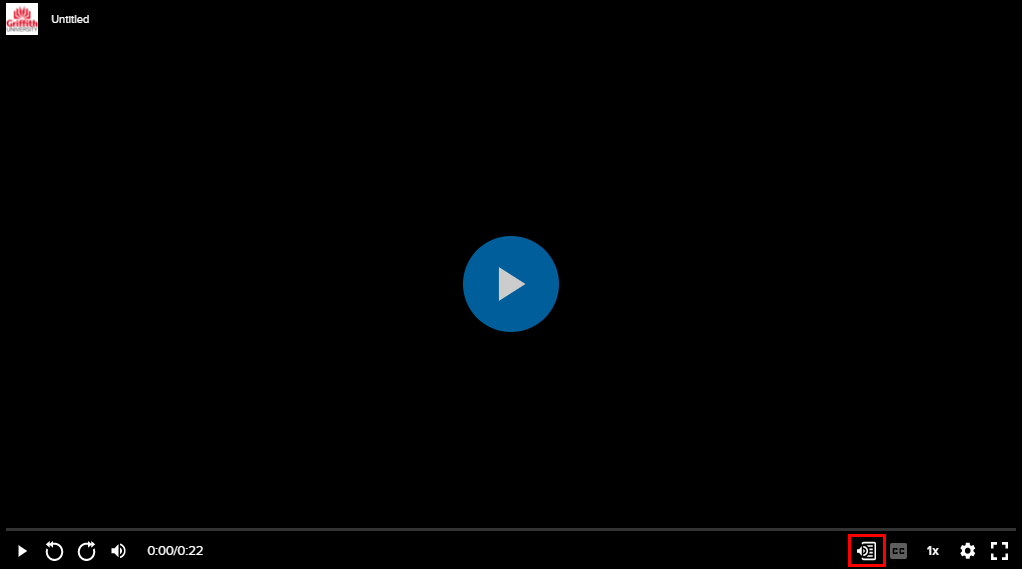
The following transcript features are available:
- As the recording plays, the highlighted portion of the transcript corresponds to the audio in the recording.
- You can also use the search bar to find key words mentioned in the recording. Clicking an underlined key word will take you to that part of the recording.
- You can download the transcript by clicking the download icon in the transcript panel
More detailed information on Echo360 transcripts can be found a Viewing Media Transcripts (Echo360 Support).
Managing Collaborate recordings
Accessing Collaborate recordings
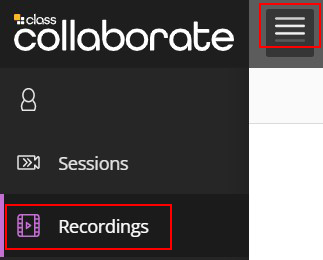
- Navigate to Collaborate in your Course Navigation
- Click the burger menu in the top left of the area
- Click Recordings
- Locate the recording you want to view and click the ellipses (...) on the right
- Click Watch Now to watch the recording in your browser
- Click Download to download a copy of the recording to your computer
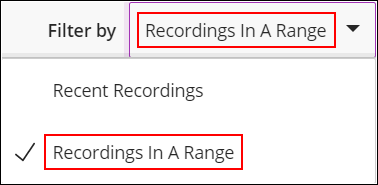
If you are looking for a recording that was made more than 30 days ago, you will need to change the display filter from Recent Recordings to Recordings In A Range.
- Click the Filter by drop down menu and select Recordings In A Range
- Use the date picker to extend the date range as far back as necessary
Enabling recording downloads for students
When a recording has finished processing, instructors always get the option to download the recording in .mp4 format. However, students will only be able to download recordings if the Allow recording downloads box is ticked in the session settings. If you need to change this setting after a session has ended:
- Navigate to the Collaborate area in your course site
- Change the Filter By setting to All Previous Sessions on the right hand side
- Locate the relevant session in the list and click the ellipses (...) on the right, then click Edit settings
- Change the session end to a date and time in the future*
- Switch to the Session Settings tab by clicking the cog icon at the top of the right-hand panel
- Tick the Allow recording downloads box
- Switch back to the Event Details tab by clicking the page icon at the top of the right-hand panel*
- Change the session end to 1 minute from now*
- Click Save to save the changes
*Please note, steps 4, 7 and 8 (changing the session end date) are not required for future sessions, recurring sessions, or sessions that are currently open.
Recording links and access type
If you want users to have access to a Collaborate recording without having to access the Collaborate area in your course site, you can generate a link to the recording. However, the recording access setting will need to be changed to Public, even if you are only providing the link in a content area within the same Learning@Griffith course site. To obtain a recording link:
- Navigate to the Collaborate area in your course site
- Click the burger menu (three horizontal lines) in the top-left of the area, then click Recordings
- Locate the relevant recording, click the ellipses (...) on the right, then click Recording settings
- Tick the Allow public access checkbox then exit the panel
- Click the ellipses (...) on the right for the relevant session again, then click Copy link to copy the link to your clipboard
- Paste the link wherever you will be providing access to the recording
For further information about recordings and recording management, see Recordings (Class Collaborate Support).
Managing Teams recordings
Teams recordings are accessible from within Microsoft Teams via the meeting chat as well as and in the Recordings folder in the Files tab.
Storing Teams recordings
- Recordings of Channel Meetings will be saved in the Recordings folder under the Files tab in the channel as well as the Meeting Chat.
- All members of the Team, including your students, will be able to access, download, edit and share these recordings. Learn how to manage channel recording permissions.
- Recordings of scheduled Calendar and Meet Now meetings will be saved into the OneDrive belonging to the person who presses record
- Meeting attendees can access the recording through the Meeting Chat
Please note that Microsoft Teams recordings automatically expire after 180 days. For information on how to extend this date, see Meeting recording auto-expiration.
Microsoft Stream Classic
All videos from old Stream (Classic) have been migrated to Stream (on SharePoint). The new Stream on SharePoint videos can be found in the owner's Griffith University OneDrive in a folder called ‘Stream migrated videos’:

Sharing Teams recordings in your Canvas course site
To share the recording with your class, you can either provide them with the link within your course site.
Providing students the link to the recording
- Locate the Teams recording (see above), go to options or click the three dots icon, and select Copy link
- Paste this link anywhere there is a Rich Content Editor. For example, a page containing meeting recordings and paste this link there along with the date
- Select Save or Save & Publish to make the link visible to students
More information on can be found at Teaching with Teams.
Video accessibility and Microsoft Teams Transcripts
When a Teams meeting is recorded, a transcript is automatically generated. It will either appear in the form of a word doc with the meeting recording, or alternatively click on the recording to open it in Microsoft Stream. From there you can manage the transcript from the video settings.