
On This Page
Need more help?
 Contact Us
Accessing your course sites
You should be able to access your course site in Canvas without needing to do anything. Your course sites are listed on your dashboard when you first log in to Canvas. You can also view favourited courses by clicking the Courses tiles in the global navigation menu.
For information on adding people to a course site, see Adding people to a Canvas course site.
Navigating your course sites
The Griffith course site template
Each Canvas course site has a template applied to promote a consistent student experience across different courses. The template includes:
- The Learning Journey, outlining the purpose and structure of the course
- An overview of assessment requirements
- Teaching staff contact information
The Learning Journey and Assessment Overview pages will automatically receive data injected from the Curriculum Management System. For information on the template and how to best use it for your teaching context, see Course site template.
Course features and learning tools
For a guided checklist on setting up your course site, see Preparing a course site.
Information on common learning activities, along with the tools and features that support them, are outlined in the following articles groups:
Useful articles include:
A list of all the Canvas tools and features is also available in the Canvas Instructor Guide (Canvas Guides).
IgniteAI
IgniteAI is a new Canvas feature that enables users to search for keywords throughout the course site, highlighting the pages where these keywords appear. This feature is still in development to improve the relevant pages seen in the search results, feedback can given to a search result.
Smart Search features and limitations :
- Smart Search is accessible via the Course Navigation links, by default this link is hidden and can be enable in the course site settings
- This feature only searches through Canvas pages, not uploaded documents or video transcript As of October 1, 2024. Searchable items include content pages, announcements, discussion prompts, and assignment descriptions.
- Users will only be able to see pages that they have access to, so students will only be able to see published pages.
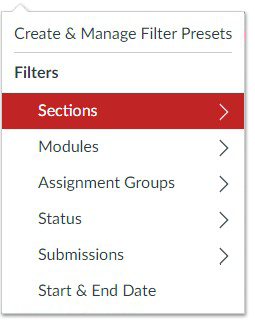
Sections
Sections in Canvas are used to segment the course site list for administrative purposes. Students are fed into sections based on their enrolment in Peoplesoft (campus and small class teaching schedule). Course Convenors listed in the Course Catalogue are automatically allocated into a Teaching Team section. When adding additional teaching team members, you should allocate them to this Teaching Team section. To view who is enrolled in each section, see How do I view enrolments in a course section? (Canvas Guides).
With sections, you can:
- Have varied due dates for assignments by section
- Classic Quizzes and New Quizzes can be assigned to sections
- Filter the Markbook by section
- Filter the SpeedGrader by section when marking student work
- View section assignments for students on the People page
- Announcements can be sent based on sections
- Discussions can be assigned to sections
However, with sections, you cannot:
- Cannot assign Pages to specific sections
- Modules cannot be assigned to specific sections
At Griffith, sections are used to bring in cohort information, and automate enrolments from Peoplesoft based on campus and tutorial times. Due to this automation and control of the enrolment feeds, Section names and memberships cannot be edited. It is not currently possible to create custom sections.
Groups
You can create groups to put students together to complete projects or other activities, and/or students can set up their own groups, which will allow them to work collaboratively. Every student group gets their own calendar, discussion board, and collaboration tools.
You can randomly assign students to groups of a specific size, or manually create and organise the groups. Once your groups are created, you can set assignments to be "group submission" assignments, which means each group will have one submission for all users of that group. One of the benefits of Groups in Canvas is that you can allow students to change groups themselves if needed.
As an instructor, use groups to:
- Set up student group configurations at the course level for group assignments and in-class work, both marked and unmarked
- Facilitate semester-long projects so that students can communicate and iterate on documents together
- Facilitate student-run study groups within courses or at the account level
Adding a group set
- In the Course Navigation, click the People link
- Click the + Group Set button
- Type in a Group Set Name
- Determine to either Split students in [number] groups or Split students into groups with [number] students per group. Alternatively, select I'll create groups later to manually create groups or create groups using a CSV file
- Click the Save button
Please note, while 'Collaborations' may be visible in the left-hand navigation of the Group Homepage, it is not currently enabled at Griffith.
The maximum number of groups Canvas can create for an automatically assigned group set is 200. If you ask Canvas to create more than 200 groups, it will only create 200.
For guidance on setting up a group assessment, see Group assessments.
For more information, see Groups (Canvas Guides).
Viewing and downloading your class list or tutorial group
To view and/or download a list of all the students in a class:
- Navigate to the Markbook
- Click Apply Filters
- Select Sections
- Select your class list from the menu
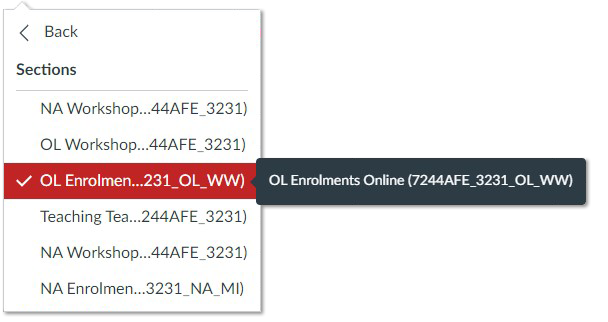
- Click Export, then select Export Current Markbook view
- A pop-up window will appear for you to select where to save the .csv file
- Click Save
How to see what students see
Canvas has a tool called Student View that allows you to view your course as if you were a student. This can be helpful to use when creating and organising content, assessments and other course elements to ensure the look, feel and navigation is how you want it to be for your students. For information on Student View and how to use it, see How do I view a course as a test student using Student View? (Canvas Guides).
For some external learning tools, Student View may not accurately reflect what students see in Canvas courses. For example, clicking on a link to Echo360 in Canvas will always return an error message in Student View, even when the link is working correctly for students. This is not an error, but simply a limitation of Student View functionality.
Course Availability for Students
A courses availability is controlled on two levels. The highest level is the Term dates set for the course, and typically has a start date and end date set up for the trimester the course is being run. Students will not be able to view the course until after the Starting Term date. The next level of access for students is based on the published status of the course. An unpublished course cannot be viewed by students, while a published course can.
A course can be set to be either published or unpublished from the Course’s Home page. For more information, see How do I publish a course? (Canvas Guides).
If a Starting Term Date has passed, but the course is set to unpublished, students will still not be able to view the course. Remember to publish your course if you want to provide students access as soon as the Starting Term Date passes. Alternatively, if you want to restrict access for some time after the term starts, leave the course unpublished.
For dynamically dated courses, the section date will control the course availability date for the students who are included in the section. If a section availability date is set to sometime in future, students in the section will still not be able to access the course even when it is published and available.
Course Site Administration
Course Shell Administration
- Course sites are created when class creation processes are finished - for more information see, Exams and Timetabling Timeline
- Course Convenors are added automatically (based on Course Catalogue data)
- Student enrolments are automatically processed into course shells from Week 10 of the Trimester before, through Sections (aligned to campus and class configuration).
- Course Shells are created Unpublished to allow the convenor to update and edit courses without students being notified of changes.
- Course Profile links are auto-populated into course site shells.
- Reading Lists (where required) are auto-populated into course site shells.
Before the start of Teaching Period
- Course sites are published by Course Convenors to students two weeks before Week 1 of teaching.
- Sections of the course site template should be completed/updated (Learning Journey, Assessment Overview, and Teaching Staff). New courses (from T3, 2023) can copy the course site template from Canvas Commons.
- Where applicable, other Teaching Team members are added by the Course Convenor prior to Teaching Week 1 to enable their access and agency in providing appropriate resources and communication.
- Establish desired collaboration channels for students (e.g., discussion boards, Teams channels, synchronous events)
- Learning resources are provided in a timely manner and are to be organised in the Modules area in a logical navigation structure. Student preference is by weeks or topics.
- Provide detailed Assessment information, including standards, criteria, and explanations, the method of submission, return of assignments and notification of marks and feedback.
- (These details will not be a variation to information provided in the Course Profile, which is the official public University document, but may expand on information contained therein.)
- For all text-based assessments, it is recommended that Assignment Tool and Turnitin are used, and students are able to access the text matching tool and the originality report (draft submissions) to assist with the revision of the work prior to its submission for marking.
During the Teaching Period
- Marks for all assessment tasks are made available through the ‘Marks’ area in a timely manner. This may be done by the examiner manually entering the marks or by using the online marking tools.
Making changes to a Course site once the Term Date has passed
In Canvas, once the Term date for a course site has passed, the course effectively becomes Read-Only.
This means, that if an instructor needs to make changes to the course, for example: adding instructors who need to view content to replicate the course structure in new iterations of the course, finalising marks, adding students / observers to the course, etc - the term end date needs to be changed to a future date to allow changes to be made to the course.
In order for this to be done, a support ticket needs to be logged. This can be done by contacting the IT Service Centre via chat, phone or by filling out the relevant form.
Managing Large Cohort Courses
Delivering courses with cohorts exceeding 2000 students within Canvas presents certain challenges, including:
- the volume of enrolments
- the volume of submissions and marking
- slower loading times for some tools including: SpeedGrader, People, Course Analytics & Markbook
To manage the challenges mentioned above, there are some tips below for how to best handle Organisation Setup & Delivery, Content Management, and Enrolment.
Recommendations - Course Setup & Delivery
- Where possible, New Quizzes should be used instead of Classic. Please be aware that some features available in Classic Quizzes may not be present in New Quizzes.
- Course delivery should be done directly through Canvas rather than using alternate avenues such as SCORM LTI
- Discussions should be avoided due to the extensive moderation required. If necessary MS Teams can be used for class discussions
Recommendations - Content Management
- To ensure smooth operation of courses and avoid unintended disruptions, such as mass notifications to students, it is recommended that instructors seek assistance from L@G Support for content management and administrative tasks.