
On This Page
Need more help?
 Contact Us
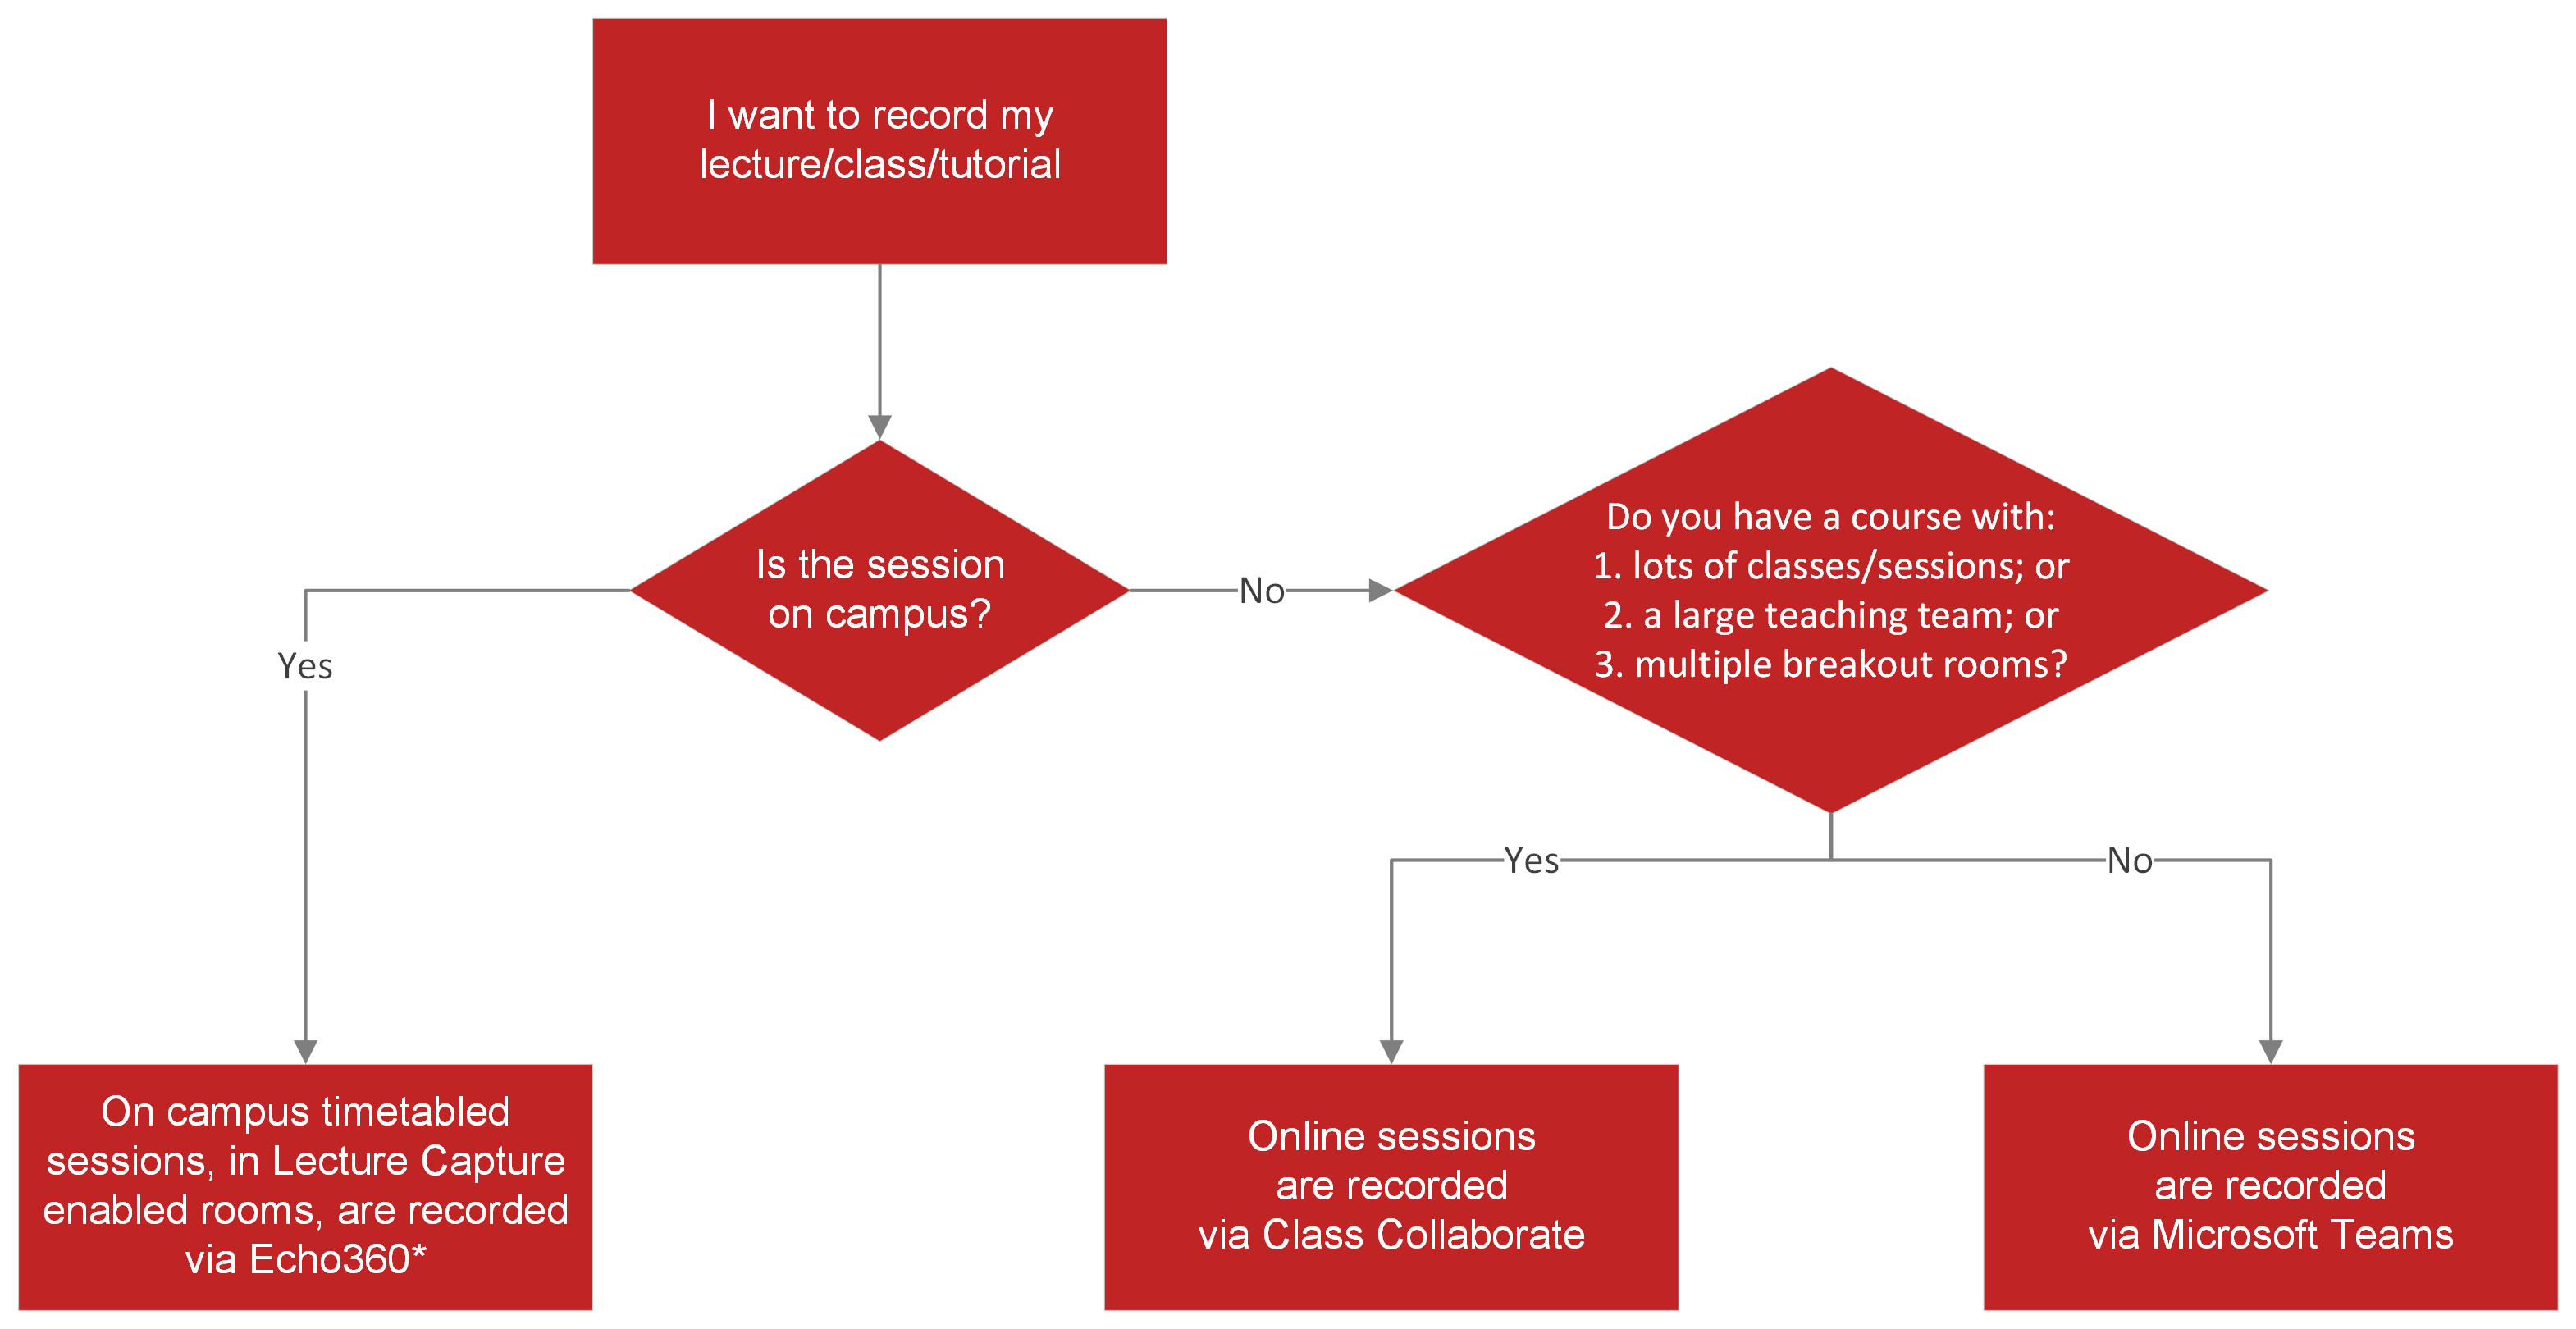
Griffith classes can be taught in person on campus, or online. Timetabled sessions in Griffith spaces, like lectures, are captured in Echo360 and online sessions taught in either Microsoft Teams, which are recorded in the Teams platform, or Class Collaborate.
*learn more about Delivering Classes with Lecture Capture, including how to ensure your session is recorded.
| Direct links to content | In person (Lecture Capture, Echo36) | Online (Class Collaborate) | Online (Microsoft Teams) |
|---|---|---|---|
| Getting ready to teach classes | Preparing in-person classes | Preparing online classes with Class Collaborate | Preparing online classes with Microsoft Teams |
| Delivering classes | In-person classes recorded in the Lecture Capture System | Delivering online classes with Class Collaborate | Delivering online classes with Microsoft Teams |
| Managing class recordings | Managing Echo360 recordings | Managing Collaborate recordings | Managing Teams recordings |
Best practices
Because lectures and other class activities are often recorded, there are some points to consider when preparing to deliver a class.
Remember, students may be viewing the recorded class on an mobile device with a small screen size, thus plan your PowerPoint or other media used accordingly.
Slide clarity and quality
| Practices to avoid when presenting
|
Preparing in-person classes
Classes that are delivered in person will automatically be recorded if they meet the requirements set out in the Lecture Capture Policy. Whether an on-campus class activity is automatically scheduled for recording or not depends on the activity type as listed in the course timetable.
In accordance with the Lecture Capture Policy, all in-person Lecture activities are scheduled for recording by default. It is possible to opt out of having in-person Lecture activities recorded during the Course Profile approval process. For more information about the Course Profile process, visit Course Profile Resources.
All other timetabled teaching activities (including Laboratory, Seminar, Workshop, Tutorial and others) are not automatically scheduled for recording by default. It is possible to opt in to having these activities recorded by specifying a Lecture Capture requirement in the Class Timetabling Resources data collection process. The activity should then be scheduled for recording, provided the booked venue is enabled for Lecture Capture. For more information about Course Profile requirements, visit Class Timetabling Resources.
Checking recording schedules
You can view all scheduled recordings for a given course at any time via Echo360:
- Navigate to https://echo360.net.au/ and log in
- Click the Courses tab at the top left of the screen
- Search for the course using the search bar (e.g. 1001PSY_3215)
- Click the tile for the course
All scheduled recordings for the selected course will then be presented.
What if I can’t find the course in Echo360?
If the correct course did not appear during step 3 above, the most likely explanation is that your user account is not enrolled in the course within the Echo360 system. To request access to a course in Echo360, complete a Lecture Capture Service Request Form, and provide the required details.
What if one of my classes is not scheduled for recording?
If the class activity is timetabled, Exams and Timetabling will be able to assist. Exams and Timetabling can be contacted by phone at (07) 5678 0544 or email at exams@griffith.edu.au and provide advice on whether:
- The booked venue is Lecture Capture enabled
- The Lecture Capture tag has been added to the activity in the Syllabus+ database
Exams and Timetabling will be able to assist with making any required changes to ensure the activity is scheduled for recording. If Exams and Timetabling make any changes to an activity, the recording schedule will be added to Echo360 overnight and be visible in the relevant Echo360 course the following day.
If the class activity is non-timetabled, the recording will need to be manually scheduled. In this case, complete a Lecture Capture Service Request Form and provide the required details.
How do students get access to the recordings?
Once the Echo360 links are created and connected to the course site, students can click the Echo360 link in the course navigation menu and see a list of the lecture recordings for the course. The Echo360 recording links can be added to either the course navigation menu or to a module.
Echo360 offers an auto-caption service. As of Trimester 1, 2022 automatic speech recognition has been turned on for all Echo360 sections.
Preparing online classes with Microsoft Teams
The integration between Microsoft Teams and your Canvas course site may feel a little bit tricky to navigate at first and there are multiple approaches that you can take. However, once you get the hang of using Teams for teaching, you will find that it has some great features to help you engage with your students in meaningful and innovative ways.
In addition, the accessibility features built into Teams are more comprehensive than those currently available within Griffith's Collaborate integration.
For more information on the platform, see Microsoft Teams as well as Limits and Specification for Teams (Microsoft Support) to understand Team and meeting capacities. Guidance on delivering online classes can be found at Delivering classes.
Scheduling classes in Teams
There are two ways to schedule classes from within Canvas: Teams Meetings, Teams Classes, and creating meeting links via the Rich Content Editor (RCE). Before setting up Microsoft Teams Meetings, or Microsoft Teams Classes, the sync option needs to be completed.
For a simple checklist of setting up Microsoft Teams Meetings, see Scheduling classes in Teams.
The differences between the different meeting options
| Create Teams meetings via: | Pros | Cons |
|---|---|---|
| Microsoft Education Teams Meetings |
|
|
| Microsoft Teams Classes (Recommended) |
|
|
| (Not functional as of 23/07/2026) Linking to Microsoft Teams meetings via the RCE |
|
|
Microsoft Sync
To use Microsoft Teams Meetings or Teams Classes, Microsoft Sync must be switched on. This syncs the enrolment and course data in your Canvas course to Microsoft Teams.
- In any Canvas course site, click Settings
- Navigate to the Integrations tab
- Turn on Microsoft Sync
- Click Sync Now

When the Microsoft Sync is turned on, it automatically generates a Microsoft Teams site for the course. Initially, this site remains inactive, meaning students won't receive invitations to join until it's activated manually by the Owner of the Teams Site (usually the Course Convenor, or another member of the Teaching Team).
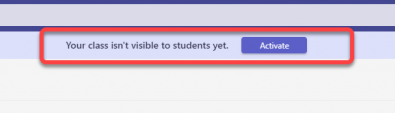
Once activated, the Teams site cannot be reverted back to an inactive state.
The Microsoft Sync calls out every 90 minutes BUT only syncs if there have been any changes in enrolments. Please wait 20 minutes after pressing Sync Now before doing any Meetings set up.
Scheduling classes in Teams
Please wait 20 minutes after pressing Sync Now before doing any Meetings set up.
Microsoft Education Teams Meetings
- Click on the Microsoft Education then Teams Meetings link in the Course Navigation
- Select New Meeting
- Enter a meeting title, date, time and any other relevant details
- OR click Add Entire Class to invite all current members of the course site
Please note: it is recommended to complete this step shortly before the course start date. If students join the course after this membership rule has been used to create the meeting, students can not see the meeting and will need to be manually added. Meeting invites are not automatically synced.
Select 'Allow anyone in the course to join' option for later enrolled students to join
- OR click Add Entire Class to invite all current members of the course site
- Click Save
- Canvas will automatically add the meeting link to everyone’s Microsoft calendars
Microsoft Teams Classes
- To activate Teams in a Canvas course site, click Settings > Integrations > Microsoft Sync > Sync Now
- Click on the Microsoft Teams Classes link in the Course Navigation. This will redirect you to Microsoft Teams
- Access the Course Team for the course
- Create a channel for online workshops or specific channels for each tutorial
- Under the conversation field, select the Meet icon
- Click Schedule a meeting
- Name the meeting and set date and time
- Click Send
- The meeting link will only be added to the meeting creator’s calendar. For students to be notified, attach an announcement to the meeting:
- Select the 3 dots ‘more options’ in the top right corner of the post containing the meeting.
- Select Edit
- Select the Format button (A)
- Select the New conversation button to change to Announcement
- Add a heading
- In the text field, type @ to tag the channel and then add any other relevant text
- Select the tick icon in the bottom right corner to save the edit
(Not functional as of 23/07/2026) Linking to Microsoft Teams meetings via the RCE
Teams meeting links can be created anywhere where you can create content with the Rich Content Editor, including Announcements, Assignments, Discussions or Pages.
- Navigate to the location or content page from where you want students to be able to join the meeting and open the RCE
You may want to create a new page within your Modules to make it easy for students to find.
- Click on the Microsoft Teams icon in the toolbar
- A window will pop up where you can Create a meeting link. You may be asked to login first
- Enter a meeting title, date, and time, then select Create
- You will be brought back to the RCE, where a meeting link in the following format will have been generated: “Join ‘name of meeting’ (Microsoft Teams Meeting)”
For information on accessing and storing meeting recordings, see Managing class recordings.
For information on roles and permissions, see Adding co-organisers to a Teams meeting.
For information on Teams analytics and downloading attendance reports, see Checking engagement in your Microsoft Team and Attendance reports in Teams (Microsoft Support).
Preparing online classes with Class Collaborate
Class Collaborate is a web conferencing tool designed specifically for education and training. As an instructor using Collaborate, you can utilise a range of communication and collaboration features to present content and engage with students for a rich online learning experience.
For more information on Class Collaborate, see Delivering online classes with Class Collaborate and Managing Collaborate recordings.
Creating and editing sessions
To create a session:
- In your Canvas course, click Collaborate in the Course Navigation
- Click the grey Create Session button
- Name the session at the top of the panel
- In the Event Details tab, fill in the required information for your session
- Click the cog icon toward the top right of the panel to access the Session Settings tab
- Review and edit the session settings as required
- If you want to give students the option of downloading recordings as .mp4 files, click the Allow recording downloads checkbox under Recordings.
- If you want to increase the maximum capacity of the session to 500 total users, tick the Allow 250+ attendees to join checkbox under Large scale session (250+). Please note large scale sessions can be no longer than 24 hours and some participant permissions are disabled (see Large Scale Session (Class Collaborate Support) for further detail).
- Click the Create button
To edit the event details or sessions settings for an existing session:
- In your Canvas course, click Collaborate in the Course Navigation
- Locate the relevant session and click the ellipses (...) on the right, then click Edit settings
For further information on event details and session settings please visit the Create and Edit Sessions (Class Collaborate Support) and Session Settings (Class Collaborate Support) support pages.
Guest access (optional)
In some cases, you may need to provide access to a Collaborate session for users who are not enrolled in the course site the session is being run from. To facilitate this, you would need to provide these users with a guest link to the session. To obtain and manage guest links:
- In your Canvas course, click Collaborate in the Course Navigation
- Locate the relevant session and click the ellipses (...) on the right, then click Edit settings
- Ensure the Guest access checkbox is ticked and check the Guest role is set to the desired role
- Click Save at the bottom of the panel to save the changes
- Click the icon to the right of the Guest link box to copy the guest link to your clipboard
- Paste the link wherever you will be providing access to the session