On This Page
Need more help?
 Contact Us
There are multiple ways to schedule online classes in Microsoft Teams to ensure students can access their online workshops and recordings, as outlined in Preparing online classes with Microsoft Teams. The below method of utilising Microsoft Teams Meetings is typically favoured among academics.
Within a few minutes, your Team will be available via the Microsoft Teams Classes link. All Teachers in the Canvas course will be added as Owners, but students won't be added until the last step.
- To activate Teams in a Canvas course site, click Settings > Integrations > Microsoft Sync > Sync Now
- Click on the Microsoft Teams Classes link in the Course Navigation. This is where you can access the Course Team (click Open on the Course Team tile).
- Create a channel for each online session (i.e. one for each tutorial, lecture, workshop).
- Return to the course site and click on Microsoft Teams Meetings.
- Click Schedule a meeting
These steps will send email invitations to students even though the Team is not yet Activated.
- Name the meeting with the course code first
- In the Add required attendees field, add individual tutors by name who might need to deliver the session. Do not 'Add entire class', as this will only add currently enrolled students
- Set the date and time. Choose repeated sessions to minimise email invitations (you can delete unneeded Occurrences later)
- In the Add channel field, select the Team, and then the channel for the session
- Add a note in the description that students should accept the relevant invitations, and decline the ones that are not relevant to them.
- Go to the course Teams site and edit the meeting in the channel to adjust Meeting Options, add co-organisers, and adjust channel moderation.
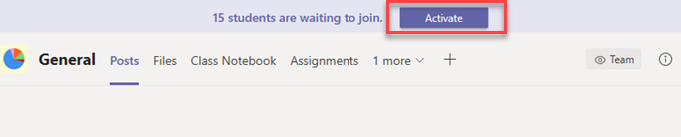
- Before your first online session, go into the Team and click Activate.